

We like to upcycle, make-do-and-mend, swap, find, haggle and barter to create our interiors.
Monday 24 December 2012
Sunday 23 December 2012
Baking Mad
Had a mad day's baking yesterday, ready for all the guests we are expecting over Christmas. Whipped up some more mince pies, as the ones I made last weekend were all eaten rather quickly!

Some were a little smaller than others, due to the slightly different sizes of our baking trays. But they all still look great packed in a nice tin for Christmas. They will just need heating through and a light dusting of icing sugar on the day.
One thing I have never made from scratch before is sausage rolls. You can buy ready to roll flaky pastry, but I wanted to try making it myself, so followed Delia's really simple recipe for quick flaky pastry, which basically involves freezing and then grating the fat. Roll the pastry out into an oblong shape, cut into three strips then roll out your sausage meat. Our butcher has some lovely organic sausage meat which really does have no rubbish in it. Do try and support your local high street shops.
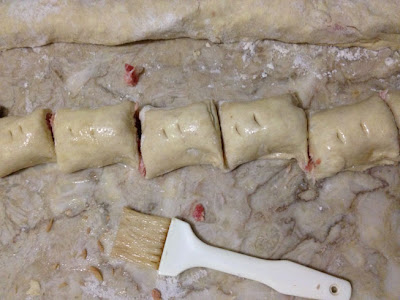
Mix in some very finely chopped onion and a pinch or two of sage, then divide and make three rolls long enough to fill your pastry. Brush one edge of the pastry with beaten egg , then roll the other side of the pastry over the sausage meat and seal it. Cut every 2 inches, brush with egg and make a couple of holes in each one, and pop them in the oven for 20 minutes or so at gas mark 7. It's great fun to watch the pastry rising though the oven door (if you have nothing better to do!)

Finally we made some cheese straws. Dead easy. Roll out more flaky pastry, cover one half with grated cheese then fold the other half over. Roll out again, squashing the cheese in the middle of the pastry. Cut into strips, twirl them around and pop them on a greased baking tray. Brush with a little egg or milk, and maybe sprinkle with some sesame or poppy seeds. Bake on gas mark 6 for about 20 minutes, until they are golden brown.

Happy baking everyone. I'm off to pick up some wine to mull. Hope you all have a very Merry Christmas.
Friday 21 December 2012
...Tum-tee-tum delightful!
So, I said I would show you how to make an origami Santa...You need a square of paper, red on one side and white on the other. Use some scrap paper from the offfice and cover any printing with red paint (we also sprinkled some glitter!) Then cut or tear out a square.

Next fold the square again, so there is a cross from corner to corner.

Then fold both sides into the centre, as you would a paper aeroplane.

Turn that over, and bring down the white bit of paper to the very centre.

Then fold it over again - this makes the brim of Santa's hat.

Turn over once more amd fold Santa's hat back up, leaving the bottom of his white beard at the bottom of his body.

Finally turn the two flaps behind him, and draw a little face:

He can now stand up and several could be very useful as table decorations, or place holders. Or you can punch a hole in his hat and hang on the tree like we did!
Happy holidays!
Wednesday 19 December 2012
Oh The Weather Outside Is Frightful...
Well, it's ok today, but it was dreadful on Saturday, when I took my boys to the Brighton Christmas Boutique Market. There was lots of shabby chic-y things there, but the boys' favourite (and mine) was Jilted Dog Art's stall (http://www.facebook.com/JiltedDogArt), selling limited edition prints, cards and calendars by local Brighton artist Paul Griffiths.

I could have very easily come home with a couple of prints (if there had been any money in the bank!) At home we made the Christmas tree. For the second year running we decided to make a totally sustainable, eco-friendly tree from some old bamboo canes we had knocking around the garden. Some judicious use of wire to tie the canes together in a rough wigwam formation, and we have lots of twigs to hang baubles off.

These baubles were picked up for pennies second hand, and jazzed up with a little paint and glitter.

And the tree looks great, with our upcycled baubles, and these rather lovely felt birds, made by pupils at my sons' school and sold at their Christmas Fair.

Tomorrow, I shall be showing you how to make one of these wonderful origami Santas!

Monday 10 December 2012
DIY - With Knobs On
This week I was lucky enough to find some old door furniture for sale at the Wood Store (http://www.woodrecycling.org.uk). Pairs of door knobs for £3 per set. An absolute bargain - how could I resist? And as the newly installed doors in my council flat have some hideous cheap looking models, I had always wanted to change them.
 Here is one of the old cheap door handles. I simply unscrewed these.
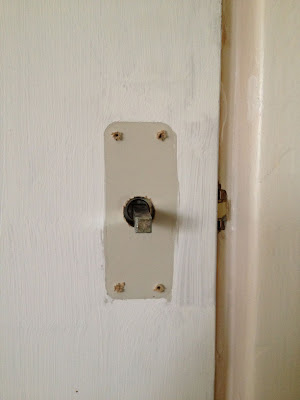

I then screwed in the "new" brass knobs. The paint is called Great White, and has a hint of dusky pink in it, which makes it a lovely warm white. Obviously the door still needs some sanding down, filling and repainting, but I really couldn't wait to show you the "new" old brass knobs!


And then sanded the holes and gave it a quick paint job. The door has been undercoated for some time, until I had the money for some more paint. In the end I used some Farrow and Ball paint I picked up for nothing from Freecycle - it's amazing what is available out there for nothing!

Monday 3 December 2012
Quick Oat Biscuits
I haven't very long today, so here is a quick recipe for you.
Mix together 125g butter, 125g sugar and 60g golden syrup.

Then add 125g flour and 125g oats, half a tablespoon of milk and a couple of drops of vanilla essence. Mix into a dough by hand and cut out your biscuit shapes.


Mix together 125g butter, 125g sugar and 60g golden syrup.

Then add 125g flour and 125g oats, half a tablespoon of milk and a couple of drops of vanilla essence. Mix into a dough by hand and cut out your biscuit shapes.

I have gone for stars, as a test run for some Christmas biscuits.Bake them in the oven on gas mark 5 for 15 to 20 minutes, until they are golden brown.

Allow them to cool on a cooling rack. They will harden to a biscuit consistency whilst they cool. They are delicious. For the Christmas biscuits I may add a dash of mixed spice. Speaking of which:

Fed the Christmas cake again today. I think it may not need another feed, as it has had most of a small bottle of brandy all to itself. It may be the booziest Christmas cake ever! I'll let you know.
Subscribe to:
Posts (Atom)